1. Introduction to Hydraulic Flanges
Hydraulic flanges are crucial components in high-pressure fluid systems, acting as strong, leak-proof connectors between pipes, hoses, and tubes. They’re widely used in industries like construction, manufacturing, agriculture, and marine operations, where hydraulic power drives machinery and equipment.
Unlike simple threaded fittings, hydraulic flanges rely on a flat face with bolt holes, enabling them to handle extreme pressures while allowing quick assembly and disassembly for maintenance. Their robustness, ease of service, and ability to prevent fluid leaks make them an industry standard.
This guide will walk you through every step of installing a hydraulic flange — from tool preparation and safety checks to proper bolt tightening and leak testing — ensuring your hydraulic connections remain safe and reliable.
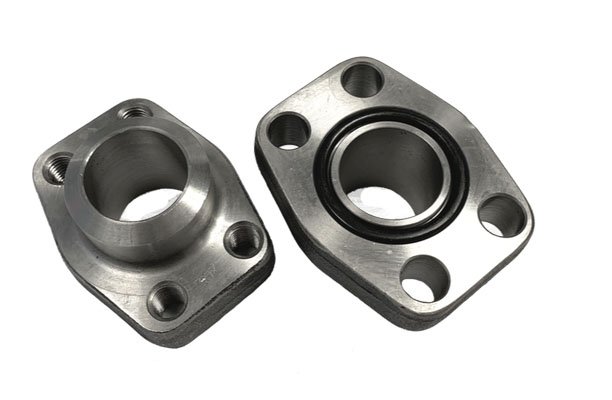
2. What is a Hydraulic Flange?

A hydraulic flange is a mechanical connector designed to join two sections of hydraulic piping or hose. It usually consists of:
- Flange head – A round or square face with bolt holes, designed to match a corresponding flange.
- Sealing mechanism – Often an O-ring, gasket, or machined face that ensures a tight, leak-proof seal.
- Bolts and nuts – High-strength fasteners that secure the flanges together.
Key advantages of hydraulic flanges include:
- High-pressure capacity – Suitable for applications exceeding 3,000 PSI.
- Alignment flexibility – Easier to install in confined spaces compared to threaded fittings.
- Serviceability – Can be removed without disturbing the entire hydraulic line.
Flanges come in different styles:
- Split flanges – Two halves bolted around the pipe or fitting.
- One-piece flanges – Solid units for heavy-duty applications.
- Threaded flanges – For lower pressure systems where quick assembly is needed.
3. Common Applications of Hydraulic Flanges
Hydraulic flanges are used anywhere high-pressure fluid transfer requires durability and easy maintenance. Common examples include:
Industrial Machinery
- Metal stamping presses
- Injection molding machines
- Conveyor systems
Construction Equipment
- Excavators, bulldozers, and loaders
- Hydraulic cranes and lifts
- Drilling rigs
Marine & Offshore
- Ship steering systems
- Offshore drilling platforms
- Winches and anchor handling equipment
Agricultural Machinery
- Harvesters and tractors
- Hydraulic plows
- Irrigation pumps
The combination of strength, leak prevention, and easy service makes flanges indispensable for these demanding environments.
4. Tools and Materials Needed for Hydraulic Flange Installation
Having the correct tools and materials is essential for a proper installation. Using makeshift equipment or the wrong components can lead to leaks, system damage, or even dangerous blowouts.
Essential Tools
- Torque Wrench – Ensures bolts are tightened to manufacturer-recommended torque values.
- Socket and Spanner Set – For handling bolts and nuts of various sizes.
- Alignment Tool or Drift Pin – Helps line up bolt holes perfectly between two flanges.
- Soft-Faced Hammer (Rubber Mallet) – For gentle tapping to adjust flange position without damage.
- Hydraulic Hose Cutter – Provides clean, square cuts on hoses for better sealing.
- Caliper or Measuring Tape – To verify flange dimensions and bolt spacing.
Required Materials
- Hydraulic Flange Kit – Includes flange, bolts, washers, and nuts.
- O-Ring or Gasket – The sealing element between flanges (check compatibility with hydraulic fluid type).
- Thread Lubricant / Anti-Seize Compound – Prevents bolt galling and allows consistent torque application.
- Cleaning Cloths – For wiping away debris, dirt, or oil from mating surfaces.
- Sealant (If Specified) – Some manufacturers require a light application on bolts or gaskets.
Pro Tip: Always match your flange and seal material to the type of hydraulic fluid in use. For example, nitrile seals work well with petroleum-based oils, while Viton is better for synthetic or high-temperature fluids.
5. Pre-Installation Safety Measures
Hydraulic systems operate under extremely high pressures — sometimes exceeding 6,000 PSI. Even a pinhole leak can inject fluid into the skin, causing severe injury. Safety is non-negotiable during installation.
Personal Protective Equipment (PPE)
- Safety Goggles or Face Shield – Protects against high-pressure fluid spray.
- Oil-Resistant Gloves – Improves grip and protects skin from chemical exposure.
- Steel-Toe Safety Boots – Shields feet from dropped tools or heavy parts.
- Protective Clothing – Long sleeves and durable workwear to guard against fluid contact.
System Safety Checks
- Depressurize the System – Use the manufacturer’s recommended procedure to release hydraulic pressure before loosening any components.
- Isolate the Hydraulic Circuit – Shut off power sources, close control valves, and lock out/tag out (LOTO) equipment.
- Clean the Work Area – Remove dirt, debris, and oil spills that could cause slipping or contamination.
- Inspect Components – Check flanges, hoses, and bolts for visible wear, cracks, or corrosion.
Important: Never loosen hydraulic fittings while the system is under pressure. High-pressure injection injuries are a medical emergency requiring immediate attention.
6. Step-by-Step Process: How to Install Hydraulic Flange
Now that your tools are ready and safety measures are in place, we can begin the installation.
1: Inspect Components
- Check the flange faces for scratches or dents.
- Inspect O-rings or gaskets for cracks, flat spots, or deformation.
- Verify that bolts, nuts, and washers are the correct grade and size for your flange type.
2: Prepare the Hose or Pipe
- Cut the hose squarely with a hydraulic hose cutter to avoid uneven sealing surfaces.
- Clean both internal and external surfaces of the hose/pipe to remove oil, debris, or metal shavings.
- Slide the flange (or flange halves) over the hose or pipe end.
3: Position and Align the Flange
- Bring the mating flanges together, ensuring bolt holes align perfectly.
- Use an alignment tool or drift pin to line up holes before inserting bolts.
- If using split flanges, ensure both halves are seated evenly around the fitting.
4: Insert and Hand-Tighten Bolts
- Insert all bolts through the aligned holes.
- Hand-tighten each bolt to hold the flanges in place, but don’t apply full torque yet.
5: Tighten Bolts in a Cross Pattern
- Use a torque wrench to tighten bolts incrementally, following a cross-diagonal sequence.
- Apply torque in three stages: 30%, 60%, and 100% of the final torque specification.
- This ensures even compression on the seal and prevents leaks.
6: Pressure Testing and Leak Inspection
- Slowly re-pressurize the system to operating pressure.
- Inspect the joint for leaks, watching carefully for small seepages.
- If a leak is detected, depressurize, check torque, and re-test.
7. Common Mistakes to Avoid During Installation
Even seasoned technicians can make errors that compromise the seal and performance of a hydraulic flange. Avoiding these mistakes will extend the life of your system and prevent costly downtime.
Mistake 1: Over-Tightening Bolts
Many assume that “tighter is better,” but excessive torque can:
- Deform the flange face
- Crush or distort O-rings/gaskets
- Cause bolt stretching, leading to eventual failure
Solution: Always use a calibrated torque wrench and follow manufacturer specifications.
Mistake 2: Skipping Alignment Checks
A misaligned flange will:
- Cause uneven sealing pressure
- Accelerate wear on the gasket or O-ring
- Increase the risk of leaks under pressure
Solution: Use alignment tools and check bolt hole positions before tightening.
Mistake 3: Using the Wrong Bolt Grade
Hydraulic flanges operate in high-pressure environments that demand high-strength bolts.
- Lower-grade bolts may shear or stretch under load.
- Using stainless steel in the wrong application can cause galling or seizing.
Solution: Verify bolt material and grade match the hydraulic system requirements.
Mistake 4: Contaminated Sealing Surfaces
Even a small piece of dirt can create a leak path.
- Contamination during installation is a common cause of seal failure.
Solution: Clean flange faces thoroughly before assembly and keep components covered until ready to install.
8. Maintenance Tips for Hydraulic Flanges
Proper maintenance ensures your hydraulic system remains safe and efficient for years.
Regular Inspection Intervals
- Check hydraulic flanges every 500–1,000 operating hours or per manufacturer guidelines.
- Look for:
- Fluid seepage
- Rust or corrosion
- Bolt loosening
- Gasket degradation
Cleaning and Lubrication
- Wipe flanges clean during regular service intervals.
- Apply anti-seize compound to bolts during installation to prevent corrosion and facilitate future maintenance.
Seal Replacement
- Replace O-rings or gaskets at every major service or whenever a leak is detected.
- Use only OEM-specified seals to ensure compatibility with hydraulic fluids and operating pressures.
Bolt Retorquing
- For critical applications, re-check bolt torque after the first 24 hours of operation.
- This helps compensate for any settling in the gasket material.
9. Troubleshooting Hydraulic Flange Issues
Even with proper installation and maintenance, hydraulic flanges can develop problems over time.
Leakage at the Joint
Possible Causes:
- Insufficient bolt torque
- Damaged or aged gasket/O-ring
- Scratched flange face
Fix:
- Depressurize system
- Replace damaged seals
- Re-torque bolts according to specifications
Bolt Loosening
Possible Causes:
- Vibration from machinery
- Improper torque application
- Incorrect bolt grade
Fix:
- Use locking washers or thread-locking compounds where specified
- Retorque bolts during regular maintenance
Misalignment Problems
Possible Causes:
- Poor initial installation
- Pipe or hose movement under pressure
Fix:
- Loosen bolts, realign flanges with drift pin, and re-tighten using cross pattern
Conclusion
Installing a hydraulic flange is about precision, safety, and reliability. By inspecting parts, aligning correctly, applying the right torque, and testing for leaks, you can ensure a strong, leak-free connection that stands up to high pressure and heavy use.
Follow manufacturer guidelines, keep sealing surfaces clean, and inspect regularly — and your hydraulic system will perform at its best for years.
FAQs
1. Can I reuse old flange bolts?
It’s not recommended. Over time, bolts can stretch or lose their tensile strength. Always replace them with new, manufacturer-approved bolts to ensure a secure connection.
2. How do I determine the correct torque value for my flange?
Refer to your equipment’s service manual or the flange manufacturer’s specifications. Torque values vary based on flange size, bolt grade, and system pressure.
3. Is lubrication always required for flange bolts?
Not always — it depends on the manufacturer’s recommendations. When specified, use only the approved lubricant or anti-seize compound to avoid chemical incompatibility.
4. Can hydraulic flanges be used in corrosive environments?
Yes, but material selection is critical. Stainless steel or coated carbon steel flanges are better suited for corrosive or marine environments.
5. How often should I check hydraulic flange connections?
Inspect them every 500–1,000 operating hours or at every scheduled maintenance interval. In high-vibration environments, more frequent inspections are advisable.
6. What’s the most common cause of flange leaks?
Improper installation — usually from incorrect torque, poor alignment, or contaminated sealing surfaces.


