Introduction
Thread integrity in hydraulic systems is absolutely critical. In a high‑pressure hydraulic circuit, fittings are often under thousands of pounds per square inch of pressure, and any compromise in their sealing or strength can rapidly lead to leaks, component failure or even a safety hazard. Damaged threads in fittings—whether caused by overtightening, cross‑threading, corrosion, or improper installation—can undermine this integrity. Ignoring such damage may lead to fluid loss, hard‑to‑diagnose inefficiencies, system downtime or worse. This guide walks you through how to diagnose thread damage in hydraulic fittings and how to repair it properly—extending component life and reducing cost by avoiding full replacements in many cases.
What Causes Thread Damage in Hydraulic Fittings?
Over‑tightening and Misalignment
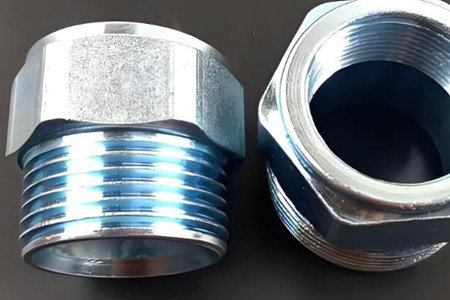
When fittings are tightened beyond the manufacturer’s torque specification, or when the male and female threads are misaligned (cross‑threaded), the thread crests can become flattened, deformed or torn. Eventually the fitting may not properly seat or seal, and the mechanical load is borne by fewer threads than designed—compromising strength.
Corrosion and Environmental Wear
Hydraulic fittings often operate in harsh environments—exposure to moisture, chemical fluids, abrasion, vibration and temperature cycling. Corrosion can eat away at the thread crests and roots, reducing thread engagement. The same applies for wear over time when fittings are repeatedly removed and reinstalled.
Poor Installation Practices
Improper practices such as failing to clean mating surfaces, using damaged or wrong‑sized sealing components (o‑rings, washers), or neglecting lubrication can lead to premature thread damage. For example, if debris is left in the threads or fittings are forced into position, threads may start to “skip” or strip rather than engage correctly.
Tools and Materials You’ll Need
Before starting any thread repair on a hydraulic fitting, assemble the correct tools and materials to do the job safely and effectively:
- Thread chasers (for cleaning and realigning existing threads without cutting new ones) or repair kits designed for hydraulic fittings. Chasers remove burrs and realign threads gently.
- Thread files, taps and dies: For more significant damage, you may need to cut new threads (with a tap), or use a die for male threads. Use the correct size/specification for the fitting.
- Thread‑insert kits (e.g., helicoil types) if the internal thread has been stripped significantly and needs to be restored to a finished thread of equal strength.
- High‑quality thread sealants, compatible with hydraulic fluid, and possibly PTFE tape (though only where appropriate and allowed by the system manufacturer). Note: threads in hydraulic fittings may seal via o‑ring or metal‑to‑metal, not always via tapered threads.
- Cleaning supplies: solvent, lint‑free rags, and inspection tools (magnifier, good light).
- Safety gear: gloves, eye protection, and ensure the system is de‑pressurized before disassembly.
Step-by-Step: How to Repair Damaged Threads in Hydraulic Fittings
Step 1: Inspect the Thread Damage
Begin by carefully inspecting the male and female threads. Use a magnifying glass or thread pitch gauge to determine the severity of the damage. Are threads slightly flattened, cross-threaded, or deeply gouged?
- Minor damage (light burrs or dirt) can often be resolved with cleaning and chasing.
- Moderate damage (flattened or crossed threads) may require tapping, re-threading or partial reshaping.
- Severe damage (missing threads or cracked surfaces) likely requires installing a thread insert or replacing the fitting entirely.
Tip: Check both the fitting and the port—damage is often present on both.
Step 2: Clean the Fitting Area Thoroughly
Before any repair can take place, the threads must be completely clean.
- Wipe down the area using a clean, lint-free rag.
- Apply a degreasing solvent to remove hydraulic oil, dust, rust flakes, or metal shavings.
- Use compressed air to blow out debris from internal threads—this is especially critical before using a tap.
This step ensures that you won’t further damage the threads during the repair process or contaminate the hydraulic system upon reassembly.
Step 3: Use a Thread File or Chaser
For external threads (on the male side), a thread file or thread chaser can reshape slightly deformed threads.
- Match the correct pitch and size of the file to the thread.
- Gently stroke the file across the threads in the direction of the thread pattern.
- This reshapes damaged thread crests and helps restore the lead-in angle.
For internal threads (female ports), use a thread chaser tap to clean and realign without cutting new metal, preserving original tolerance.
Note: Chasers do not remove metal like taps do—they clean, reshape and realign.
Step 4: Tap and Re-thread if Needed
If chasing the threads isn’t enough—especially if they’re partially stripped—you may need to re-thread using a tap (for female threads) or die (for male threads).
- Choose the correct size and pitch matching the damaged fitting.
- Apply cutting oil to reduce friction and prevent binding.
- Slowly turn the tap into the fitting by hand, backing off every few turns to clear debris.
- Clean thoroughly after re-threading to remove metal shavings.
This step cuts into the damaged metal, reshaping or removing affected areas to recreate a functional thread profile. It’s especially useful when you need full re-engagement with the mating fitting.
Step 5: Install a Thread Insert (If Needed)
When the internal threads are completely stripped, a thread insert—like a Heli-Coil or Time-Sert—is a reliable solution.
- Drill out the damaged threads using the correct bit size for the insert kit.
- Tap a new thread to accept the insert.
- Install the insert using the provided tool, making sure it seats below the surface.
- Break off the tang if required (for Heli-Coils).
Thread inserts restore the original thread dimensions and strength, allowing the fitting to function as if it were new. Be sure to confirm compatibility with hydraulic pressures and materials.
Step 6: Apply Thread Sealant and Reassemble
Once the threads are restored, it’s time to put everything back together.
- For tapered threads, apply a hydraulic-compatible thread sealant or PTFE tape (used sparingly to avoid contamination).
- For straight threads, use the correct o-ring or sealing washer and inspect it for wear or cracks.
- Reassemble the fitting carefully, making sure threads align properly before applying torque.
- Use a torque wrench to tighten the fitting to the manufacturer’s recommended specs—over-tightening is a common cause of damage.
Step 7: Test for Leaks Under Pressure
With the fitting repaired and reassembled:
- Gradually re-pressurize the hydraulic system while monitoring the repaired area.
- Use a leak detection spray or paper towel to check for fluid seepage.
- If leaks persist, disassemble and recheck thread engagement, seals, and alignment.
When NOT to Repair and Replace Instead
Thread repairs aren’t always the safest or most cost-effective option. In the following situations, it’s best to replace the hydraulic fitting or component entirely:
- Severe Thread Galling or Stripping: If threads are torn off completely or the base material is cracked, repair attempts won’t restore full strength.
- Pressure Rating Is Compromised: In high-pressure systems, any thread deformation may lead to catastrophic leaks. Repairs could pose safety risks.
- Manufacturer Guidelines: Some hydraulic system manufacturers explicitly prohibit thread repairs due to safety or warranty concerns.
- Repeated Failures or Fatigue Damage: If a fitting has been repaired multiple times, the material may be fatigued or weakened—replacement ensures reliability.
Tip: Always consult your system’s service manual or engineering team before deciding to repair threads in mission-critical or safety-sensitive systems.
Pro Tips to Prevent Future Thread Damage
Preventive practices are the most cost-effective strategy for avoiding future thread damage. Follow these tips to protect your fittings and system integrity:
- Use Proper Torque Tools: Always tighten to the manufacturer’s specifications using a calibrated torque wrench.
- Lubricate Threads When Recommended: Use the correct lubricant or anti-seize compound to prevent galling—especially with stainless steel or aluminum fittings.
- Clean Threads Before Assembly: Even tiny particles can interfere with thread engagement or damage threads over time.
- Avoid Cross-Threading: Start threads by hand and ensure proper alignment before applying torque.
- Replace Worn Seals Promptly: Damaged o-rings or washers can force overtightening, increasing thread stress.
- Train Technicians: Proper installation technique is one of the most effective defenses against thread damage.
Conclusion
Repairing damaged threads in hydraulic fittings is a highly doable, cost-saving process—if done correctly. Whether you’re using a simple thread chaser or a thread insert for deeper fixes, the goal is always the same: restore proper thread engagement, sealing ability, and mechanical strength. Always assess the extent of damage before beginning, use the right tools for the job, and know when it’s smarter to replace rather than repair.
By applying these techniques and preventive tips, you can minimize downtime, reduce costs, and ensure the safe, leak-free performance of your hydraulic systems.
FAQs
Can I use epoxy to repair stripped threads in hydraulic systems?
While some heavy-duty epoxies claim to bond metals, they are not recommended for hydraulic fittings. These joints must withstand high pressures and mechanical loads—epoxies don’t provide the necessary strength or thread engagement.
Are Heli-Coils safe for high-pressure hydraulic applications?
Yes—if installed correctly and rated for the material and pressure, Heli-Coil or Time-Sert inserts can restore internal threads effectively. Always confirm compatibility with hydraulic pressures, thread size, and the fitting’s specifications.
How do I know if my thread damage is too severe to repair?
If threads are missing, the fitting material is cracked, or the connection won’t hold pressure after basic repair attempts, replacement is required. Also, follow OEM guidelines—some systems prohibit thread repairs entirely.
What’s the difference between chasing and tapping threads?
- Chasing cleans and realigns threads without cutting new metal.
- Tapping involves removing damaged material and cutting new threads.
Chasing is ideal for minor damage; tapping is reserved for moderate to severe thread issues.
Can reused fittings cause thread damage?
Yes. Repeated removal and reinstallation can wear down threads, especially if done improperly or without cleaning. Always inspect used fittings and replace them if you see signs of distortion or wear.


