Hydraulic systems are critical in industries ranging from construction to agriculture, where efficient, high-pressure fluid transfer is essential. When leaks develop in hydraulic fittings, they can compromise the system’s efficiency, safety, and reliability. This guide provides a detailed approach to fixing leaking hydraulic fittings.
Causes of Hydraulic Fitting Leaks
Hydraulic fitting leaks can result from a combination of operational and installation issues. Understanding these causes is essential for effective troubleshooting and prevention. Below is a detailed examination of the common reasons behind hydraulic fitting leaks:
Improper Installation
Mistakes during installation are a leading cause of leaks in hydraulic fittings. These errors may include:
- Misalignment: If fittings or hoses are not aligned properly, the connection may not seal completely, leaving small gaps for fluid to escape.
- Under-Tightening: Connections that are not tightened enough may lack the compression required to form a secure seal.
- Over-Tightening: Over-tightening can deform threads or crush O-rings, which compromises the seal.
- Wrong Components: Using the wrong type of fitting, seal, or hose for a specific hydraulic application can lead to incompatibility and leakage.
Worn-Out Seals
Hydraulic seals, such as O-rings or gaskets, are subject to wear over time due to:
- Aging: Natural degradation occurs as seals lose their elasticity and become brittle.
- Heat and Pressure Cycles: Continuous exposure to extreme temperatures and high-pressure variations can weaken seals, leading to leaks.
- Contamination: Dirt, debris, or foreign particles in the hydraulic fluid can erode or damage seals, affecting their effectiveness.
Damaged Threads
Threads on fittings are crucial for forming secure connections. Damage to threads can arise from:
- Cross-Threading: Misaligned threading during installation can strip or deform threads, preventing a proper seal.
- Corrosion: Exposure to moisture, chemicals, or corrosive fluids can weaken threads, making them prone to leaks.
- Wear and Tear: Over time, frequent disassembly and reassembly can degrade thread integrity.
Overpressure in Hydraulic Systems
Hydraulic systems are designed to operate within specific pressure ranges. Exceeding these limits can stress the fittings and cause leaks:
- Pressure Surges: Sudden spikes in pressure, often caused by abrupt valve closures, can force fluid through seals and connections.
- Excessive Operating Pressure: Prolonged operation at pressures above the recommended levels can deform components, leading to leaks.
- Undersized Fittings: Using fittings not rated for the system’s pressure can result in bursting or leakage.
Vibration and Mechanical Stress
Hydraulic systems in machinery are often exposed to continuous vibration and mechanical loads. These can weaken connections and lead to leaks:
- Vibrational Loosening: Constant vibration can cause fittings to loosen over time, breaking the seal.
- Fatigue Failure: Repeated flexing of hoses and fittings can crack or damage components, creating pathways for fluid escape.
- Improper Support: Lack of proper clamps or supports for hoses and fittings can increase strain on connections.
Contamination and Blockages
Foreign particles in hydraulic fluid can cause leaks by damaging critical components:
- Erosion of Seals: Abrasive particles can wear down seals and fitting surfaces, making them less effective.
- Blocked Passages: Clogged hydraulic lines can increase internal pressure, forcing fluid through weak points in the fittings.
Material Defects or Wear
Defects in the material of the fittings or hoses themselves can lead to leaks over time:
- Substandard Components: Low-quality fittings or counterfeit parts may not meet the required specifications, making them prone to failure.
- Fatigue Cracks: Overuse or exposure to extreme conditions can cause cracks in fittings, allowing fluid to escape.
Improper Hydraulic Fluid Compatibility
Using the wrong hydraulic fluid can degrade seals and other components:
- Chemical Incompatibility: Certain fluids can react with seals, causing swelling, cracking, or dissolution.
- Viscosity Issues: Fluids that are too thick or thin can create excessive strain on seals, leading to leaks.
Thermal Expansion and Contraction
Temperature changes can affect hydraulic fittings and seals in several ways:
- Expansion: High temperatures can cause fittings to expand, loosening the connection.
- Contraction: Low temperatures can shrink seals, leading to gaps and leaks.
Safety Precautions Before Fixing Leaks
Importance of Hydraulic System Safety
Hydraulic systems operate under high pressure, making safety a top priority. Accidental fluid sprays can cause injuries.
Tools and Protective Gear Needed
Before beginning repairs, gather safety equipment such as gloves, goggles, and sturdy workwear to minimize exposure to hydraulic fluids.
De-pressurizing the System
Always release the system’s pressure before inspecting or repairing hydraulic fittings. This prevents accidental fluid release and ensures safety during the process.
Identifying the Source of the Leak
Steps to Locate the Leak
- Visual Inspection: Check around fittings for visible signs of hydraulic fluid.
- Clean the Area: Wipe down components to better identify leaks.
- Test the System: Slowly re-pressurize the system to pinpoint the exact location of the leak.
Tools to Help Pinpoint Leaks
- UV Leak Detectors: Fluorescent dyes highlight leaks under UV light.
- Leak Detection Sprays: Specialized sprays bubble up when exposed to escaping fluid.
Common Signs of Hydraulic Fitting Damage
- Wet or oily residue around connections.
- Reduced system performance.
- Unusual noises from the hydraulic system.
Tools and Materials Needed
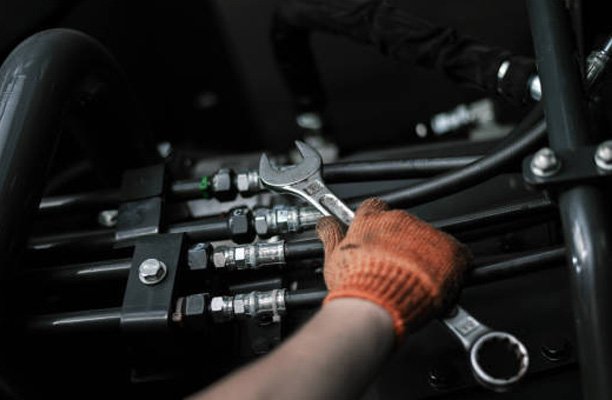
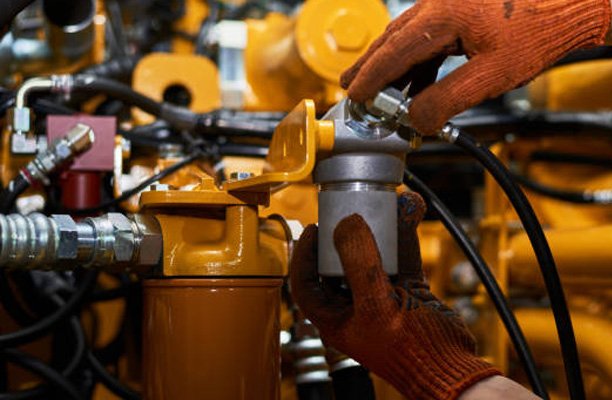
- Wrenches and Torque Tools: Essential for loosening and tightening fittings.
- Sealants and Thread Tape: For ensuring tight, leak-proof connections.
- Replacement Parts: Stock up on O-rings, seals, and spare fittings.
- Cleaning Supplies: Use lint-free cloths and degreasers to clean fittings.
Step-by-Step Guide to Fixing Hydraulic Fittings
Addressing leaks in hydraulic fittings requires a methodical approach to ensure the problem is effectively resolved without causing further damage. Below is an extended, comprehensive step-by-step guide for fixing hydraulic fittings, ensuring safety, precision, and long-term reliability.
Step 1: Inspecting the Fitting
- Turn Off the System and De-pressurize:
Begin by powering down the hydraulic system and releasing all pressure. This step is crucial to avoid fluid sprays, which can be dangerous. - Examine the Fitting Closely:
Inspect the fitting and surrounding areas for visible damage, such as cracks, worn seals, or corroded threads. - Assess the Connection Type:
Identify whether the fitting is threaded, compression, or flared. This will determine the tools and techniques needed for the repair. - Look for Secondary Issues:
Check nearby hoses and components for signs of wear or leaks, as these may contribute to or exacerbate the issue.
Step 2: Cleaning the Area
- Remove Residual Fluid:
Wipe the affected area with a lint-free cloth to remove hydraulic fluid, dirt, and debris. - Use Degreasers:
Apply a degreaser or specialized hydraulic cleaner to ensure the area is completely clean and dry. A clean surface helps you accurately assess the fitting and ensures proper sealing during reassembly. - Inspect the Cleaned Area:
After cleaning, re-check the fitting for damage that may have been obscured by dirt or oil.
Step 3: Replacing Damaged Components
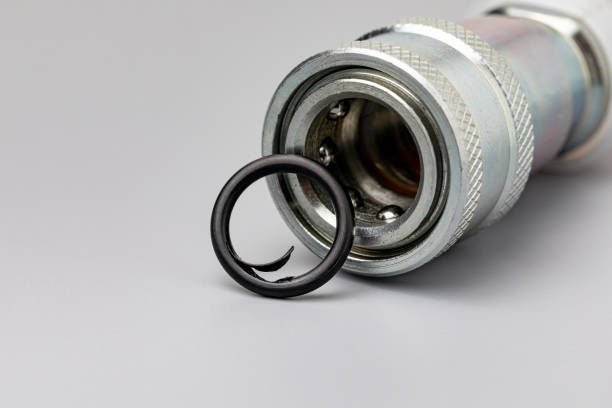
- Replace Worn O-rings or Seals:
- Remove the old O-ring or seal using a pick tool, being careful not to scratch the fitting.
- Match the replacement seal or O-ring with the exact size and material specified by the manufacturer.
- Apply a thin layer of hydraulic fluid to the new O-ring to ensure it seats properly and forms a tight seal.
- Replace Damaged Fittings:
If the fitting itself is cracked or stripped, replace it with a new one that matches the system’s specifications. - Inspect Hose Ends:
Ensure that the hose end connecting to the fitting is free of cracks, abrasions, or deformities. Replace if necessary.
Step 4: Preparing the Threads
- Clean the Threads:
Use a wire brush or thread cleaner to remove debris, old sealant, or corrosion from the fitting threads. - Inspect for Damage:
Check threads for wear or cross-threading. Replace the fitting if the threads are significantly damaged. - Apply Thread Sealant or Tape (If Needed):
- Use thread tape or a hydraulic-approved thread sealant on tapered threads only.
- Wrap the thread tape in the same direction as the threads to prevent unraveling during tightening.
- Avoid over-applying sealant to prevent clogging the hydraulic system.
- Do not apply sealant on fittings with O-rings or face seals, as they rely on mechanical compression for sealing.
Step 5: Re-tightening the Fittings Properly
- Align the Fitting:
Ensure the fitting and its counterpart are properly aligned. Misalignment can cause leaks even if the connection is tight. - Hand-Tighten First:
Start by hand-tightening the fitting to prevent cross-threading. - Use the Correct Tools:
- For threaded fittings, use a torque wrench to tighten the connection to the manufacturer’s recommended torque values.
- For compression fittings, ensure the ferrule is properly compressed without over-tightening.
- Avoid Over-Tightening:
Excessive force can damage threads, crush seals, and create new leaks. Follow the system manual to avoid this.
Step 6: Testing the Repair
- Re-pressurize the System:
Gradually restore pressure to the hydraulic system to test the repaired fitting. Start at low pressure and slowly increase to operational levels. - Monitor the Connection:
Carefully inspect the fitting for leaks while the system is running. Use a flashlight or mirror for hard-to-see areas. - Use Leak Detection Tools:
- Apply a leak detection spray that bubbles upon contact with escaping fluid.
- For more precise results, use UV dye and a UV light to locate micro-leaks.
- Repeat if Necessary:
If a leak persists, release the pressure, revisit the fitting, and check for improper installation or missed damage.
Step 7: Final Tightening Adjustments
- Fine-Tune Tightness:
If a minor leak is detected, slightly tighten the fitting using a wrench, being cautious not to over-tighten. - Double-Check Alignment:
Confirm that the hose and fitting are correctly aligned. Misalignment can cause leaks even if the fitting is secure.
Step 8: Perform a Functional Test
- Run the System Under Load:
Operate the machinery or equipment to simulate regular use conditions. - Observe Long-Term Performance:
Monitor the system over an extended period to ensure no intermittent leaks occur during operation. - Verify System Efficiency:
Confirm that hydraulic pressure and performance are back to normal, indicating a successful repair.
Step 9: Final Cleanup and Documentation
- Clean Residual Fluid:
Wipe away any remaining hydraulic fluid from the fitting and surrounding area to keep the system clean. - Document the Repair:
Record the repair details, including parts replaced, tools used, and final torque values. This information can be helpful for future maintenance. - Dispose of Waste Properly:
Dispose of any contaminated materials, such as old seals, rags, or hydraulic fluid, in accordance with local regulations.
Using Thread Sealants and Tape
When to Use Thread Sealants
Apply sealants on tapered threads to create a reliable seal, especially in high-pressure systems. Avoid using sealants on fittings with O-rings, as they do not require additional sealing.
Proper Application Techniques
- Clean threads thoroughly before applying.
- Wrap thread tape clockwise around the male fitting’s threads.
- Apply a thin, even layer of sealant.
Avoiding Overuse of Sealants
Excessive use can block fluid flow or cause contamination in the hydraulic system.
Addressing Over-Tightening Issues
Risks of Over-Tightening
- Deformation of seals.
- Stripped threads leading to loose connections.
Correct Torque Specifications
Consult the manufacturer’s manual for proper torque values. Then, use a torque wrench to achieve precise tightening without overdoing it.
Testing the Repair
Re-pressurizing the System Safely
After repairs, gradually re-pressurize the hydraulic system to test the integrity of the fittings.
Monitoring for Leaks
Closely observe the repaired area under operational pressure to ensure the leak is resolved.
Common Testing Techniques
- Run the system at low pressure first, gradually increasing to full pressure.
- Use a leak detection spray to confirm a secure seal.
Preventative Measures to Avoid Future Leaks
Regular Maintenance Tips
- Inspect hydraulic fittings and hoses periodically.
- Replace seals and fittings at the first sign of wear.
Proper Installation Practices
- Follow the manufacturer’s guidelines during installation.
- Use proper tools and avoid makeshift solutions.
Choosing High-Quality Fittings
Invest in durable, corrosion-resistant fittings to minimize future issues.
When to Call a Professional
Situations Requiring Expert Assistance
- Persistent leaks despite repairs.
- Major hydraulic system failures.
- Difficulty accessing or replacing fittings.
Costs vs. Benefits of Professional Repair
Though professional services may be costly, they save time and ensure reliable, long-lasting repairs.
Conclusion
Fixing leaking hydraulic fittings requires a methodical approach, proper tools, and adherence to safety protocols. By understanding the causes of leaks and following preventative measures, you can maintain a reliable and efficient hydraulic system. Prompt attention to leaks not only ensures safety but also extends the life of your equipment.
FAQs
1. What Are the Most Common Causes of Hydraulic Fitting Leaks?
Improper installation, worn seals, damaged threads, and overpressure are the primary culprits.
2. Can Thread Tape Fix All Hydraulic Leaks?
No, thread tape is only suitable for certain types of fittings. It should not be used on fittings with O-rings.
3. How Can I Prevent Over-Tightening?
Use a torque wrench and adhere to the manufacturer’s recommended torque specifications.
4. Is It Safe to Fix Leaks Myself?
Yes, for minor leaks, but ensure you follow all safety precautions. For complex issues, seek professional help.
5. How Often Should I Check Hydraulic Fittings for Leaks?
Inspect fittings during routine maintenance or whenever you notice system performance issues.
6. What Tools Are Essential for Hydraulic Repairs?
A torque wrench, sealants, replacement parts, and cleaning supplies are key tools.


