Compression fittings are one of the easiest and most reliable ways to connect pipes or tubes without requiring specialized tools or extensive plumbing skills. Whether you’re working on a plumbing repair, installing a new water supply line, or connecting a gas appliance, compression fittings are versatile and user-friendly.
In this comprehensive guide, we’ll explain what compression fittings are, why they’re so useful, and provide you with detailed step-by-step instructions on how to install one correctly. By the end, you’ll be equipped to handle this project like a pro—saving yourself time and possibly a hefty plumber’s bill!
Let’s get started!
What Is a Compression Fitting?
A compression fitting is a plumbing connector used to join two pipes or tubes, commonly made of metal or plastic. They are widely used in both residential and industrial applications due to their simplicity, reliability, and versatility.
The fitting creates a watertight or airtight seal through compression, making it suitable for water, gas, or oil connections. Unlike soldering or welding, which require heat and expertise, compression fittings are mechanical and only need basic tools for installation.
Components of a Compression Fitting:
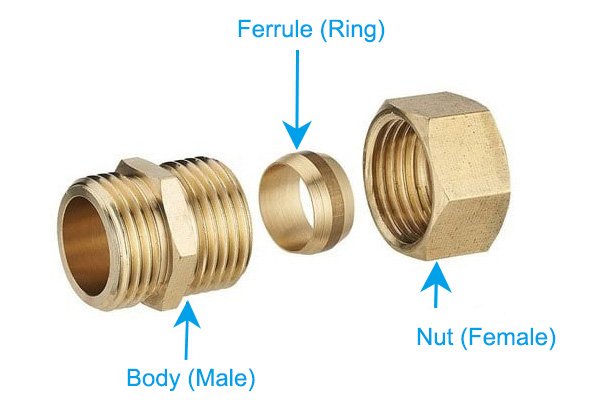
- Compression Nut: The threaded nut that tightens over the body to compress the ferrule.
- Compression Ring (Ferrule): A ring-shaped piece (usually brass or plastic) that forms a seal by compressing around the pipe.
- Body: The main piece of the fitting where the pipe is inserted. This can include threads and an internal shoulder for the pipe to sit against.
Why Use a Compression Fitting?
- Ease of Installation: No need for soldering or adhesives.
- Durability: Provides a strong, leak-free connection when properly installed.
- Reusability: Most parts of the fitting can be reused, except for the ferrule in some cases.
- Versatility: Works for both metal and plastic pipes.
Tools and Materials You’ll Need
Before starting, make sure you have everything you need. A well-prepared workspace will make the installation process smooth and efficient.
Required Tools:
- Adjustable Wrench: For tightening the compression nut.
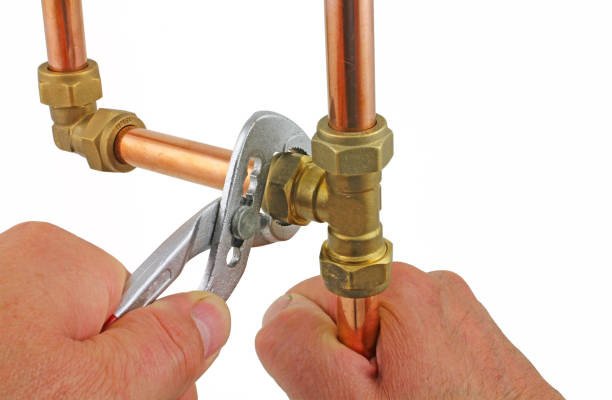
- Second Wrench or Pliers: To hold the fitting body in place while tightening the nut.
- Pipe Cutter or Hacksaw: If the pipe needs to be trimmed to size.
- Deburring Tool or Sandpaper: To smooth the cut edges of the pipe and remove any burrs.
Optional Tools:
- Teflon Tape: For extra seal protection (though usually not required).
- Measuring Tape: To measure and mark the pipe accurately.
Materials:
- Compression Fitting: Ensure you choose the correct size to match your pipe diameter.
- Pipe: Copper, plastic, or other compatible materials depending on your fitting type.
- Clean Cloth: For wiping down the pipe and fitting components.
Step-by-Step Guide to Installing a Compression Fitting
Step 1: Turn Off the Water Supply
Always start by shutting off the water supply to the area where you’re working. For plumbing repairs, locate the nearest shutoff valve and turn it off. If you can’t find one, you may need to shut off the main water supply to your home.
Pro tip: Open a faucet downstream from the shutoff valve to relieve any water pressure in the pipe. This will help prevent residual water from spilling out while you work.
Step 2: Cut and Prepare the Pipe
If you’re installing a compression fitting on an existing pipe, you may need to trim it. Use a pipe cutter or hacksaw to cut the pipe to the desired length. It’s crucial to ensure that the cut is clean and square—crooked or uneven cuts can cause leaks or improper sealing.
After cutting the pipe:
- Use sandpaper or a deburring tool to smooth the edges.
- Check the pipe for any dirt, debris, or old pipe sealant and wipe it clean with a cloth.
- Make sure the pipe surface is smooth and free of any scratches or gouges where the ferrule will make contact.
Step 3: Slide on the Compression Nut and Ring
Next, slide the compression nut onto the pipe. The threaded side of the nut should face the end of the pipe that will be inserted into the fitting.
Then, slide the compression ring (ferrule) onto the pipe. Position it approximately 1 inch from the pipe end. The ferrule is what creates the seal, so proper placement is essential.
Step 4: Insert the Pipe into the Fitting Body
Push the prepared end of the pipe into the fitting body. Ensure that the pipe seats firmly against the internal shoulder of the fitting—this provides the foundation for a secure connection.
Double-check that the ferrule is sitting snugly between the nut and the body. This alignment is crucial for creating a leak-proof seal.
Step 5: Tighten the Compression Nut
Once everything is aligned, start tightening the compression nut by hand. This ensures proper threading without cross-threading.
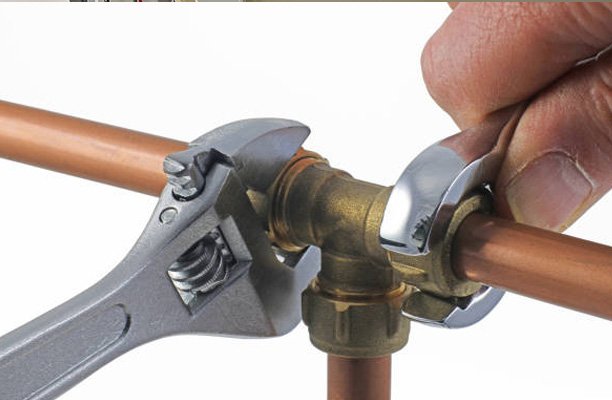
Next, use your wrench to tighten the nut further. Hold the fitting body in place with a second wrench to prevent it from twisting.
- Tighten the nut until you feel resistance.
- Give it an additional quarter to half turn to compress the ferrule securely.
- Be careful not to overtighten, as excessive force can deform the ferrule or damage the fitting.
Step 6: Test for Leaks
Turn the water supply back on slowly and inspect the fitting for leaks. Pay close attention to the area around the nut and ferrule.
- If you see small drips, gently tighten the nut a bit more and recheck.
- Persistent leaks may require you to disassemble the fitting, clean the components, and reinstall.
Tips for a Successful Installation
- Clean Pipes Are Key: Dirty or scratched pipes can prevent the ferrule from sealing properly.
- Hand-Tighten First: Starting by hand reduces the risk of cross-threading and ensures proper alignment.
- Mark the Pipe: Before inserting the pipe into the fitting, mark the pipe with a pencil or marker to indicate how far it should go into the fitting body.
Common Mistakes to Avoid
- Improper Ferrule Placement: Ensure the ferrule is positioned correctly between the nut and fitting body. Misaligned ferrules won’t seal properly.
- Over-Tightening: Excessive force can damage the ferrule or deform the pipe, causing leaks. Tighten just enough to create a seal.
- Using Mismatched Sizes: Always check that the fitting size matches the pipe diameter.
Conclusion
Installing a compression fitting is straightforward when you follow the proper steps. From preparing the pipe to tightening the nut just right, each step plays a critical role in ensuring a leak-free connection. These fittings are an excellent solution for most household plumbing and DIY projects, offering durability and ease of use.
So, go ahead—give it a try and see how easy it is to master this skill! And don’t forget: preparation, patience, and precision are your best friends in this process.
FAQs
Q1: Can I use a compression fitting for hot water pipes?
A: Yes, you can. Compression fittings work well for hot water pipes, but make sure the materials are rated for high temperatures.
Q2: Do I need special tools to install a compression fitting?
A: Not really! All you need is an adjustable wrench (or two), a pipe cutter, and maybe some sandpaper. No soldering, glues, or special tools are required.
Q3: Why is my compression fitting leaking?
A: It could be because the nut isn’t tight enough, the ferrule isn’t aligned correctly, or the pipe ends are dirty or uneven. Loosen everything, clean the parts, and reassemble carefully.
Q4: Can I reuse a compression fitting?
A: You can reuse the nut and fitting body, but the ferrule (the small ring) might not seal properly after being used once. It’s best to replace the ferrule if you’re reinstalling.
Q5: Do I need Teflon tape for a compression fitting?
A: Nope! Teflon tape isn’t necessary because the ferrule creates the seal. You can use it on the threads if you want, but it’s optional.
Q6: How tight should I make the compression nut?
A: Tighten it by hand first, then use a wrench to give it a quarter to half turn. Don’t overtighten—too much force can damage the fitting or pipe.

