Introduction
Swage fittings play a crucial role in a wide variety of applications, from plumbing systems to hydraulic machinery. Their versatility, ease of use, and reliability make them the preferred choice in industries with high-pressure systems. Whether you are a professional or a DIY enthusiast, understanding how to properly install swage fittings is essential for ensuring the longevity and safety of your equipment. In this guide, we will walk you through the installation process of swage fittings, highlighting key steps, tools, and best practices to follow.
What are Swage Fittings?
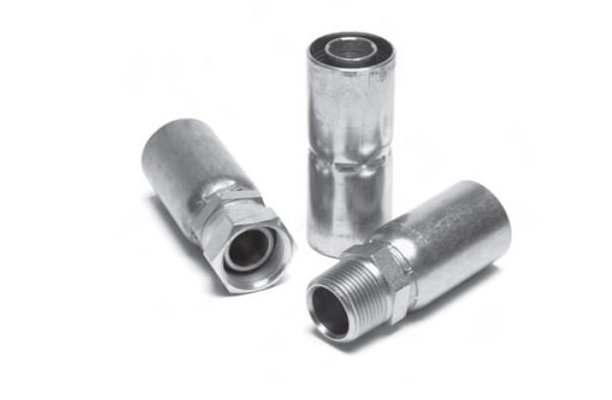
Swage fittings are specialized connectors used to join tubing or hoses to various components in high-pressure systems. Unlike compression fittings that rely on screws to secure the connection, swage fittings use a method called swaging, which involves mechanically pressing the fitting onto the tubing to create a secure, leak-proof seal. Industries such as hydraulics, automotive, construction, and manufacturing widely use swage fittings to provide reliable connections for fluid or gas transport under high pressure.
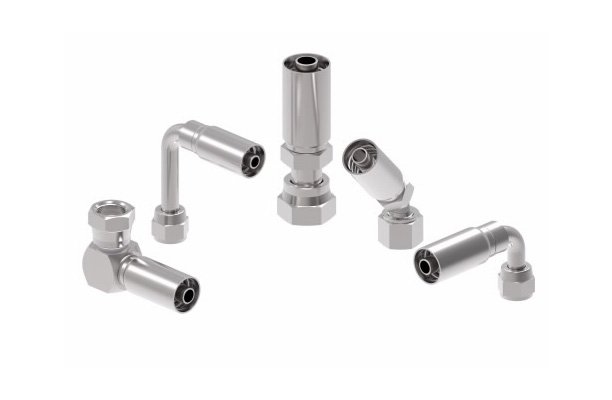
There are several types of swage fittings, each designed for specific applications:
- Tube Fittings: Commonly used in plumbing and refrigeration systems.
- Hose Fittings: Ideal for securing hoses in high-pressure fluid transport systems.
- Hydraulic Fittings: Designed for hydraulic systems that operate under extreme pressure conditions.
People value swage fittings for their durability, ability to withstand high temperatures and pressures, and cost-effectiveness in many applications. Unlike other fittings, they eliminate the need for threaded connections or soldering, offering a quick and secure installation process.
Why Swage Fittings Are Essential
Swage fittings offer several advantages that make them a top choice in various industries. Here’s why they are essential:
- Durability and Reliability: Swage fittings are engineered to provide long-lasting and secure connections. Once installed, they remain secure, reducing the likelihood of leaks or failures over time.
- High Pressure and Temperature Resistance: These fittings can handle extremely high-pressure environments, making them ideal for hydraulic and pneumatic systems. They also perform well under high-temperature conditions, which is vital for systems such as automotive fuel lines.
- Cost-Effectiveness: The installation process for swage fittings is relatively straightforward, which reduces labor costs. Additionally, swage fittings are durable, minimizing the need for frequent replacements and maintenance.
These characteristics make swage fittings an indispensable tool for maintaining safety and efficiency in industrial and mechanical applications.
Tools and Materials Needed for Installing Swage Fittings
Before starting the installation process, it’s important to have all the necessary tools and materials on hand. This will ensure that the installation is done correctly and efficiently. Below is a list of essential tools and materials required for installing swage fittings:
- Swaging Tool: The most crucial tool for the installation. It compresses the fitting onto the tubing. Swaging tools come in various sizes and styles, depending on the type and size of the swage fitting being used.
- Swage Fittings: The fittings themselves must be of the correct size and type to match the tubing or hose you are working with.
- Tubing or Hose: Depending on the application, you will need either rigid tubing or flexible hose. Make sure to choose the right material and size for the job.
- Measuring Tools: A ruler or caliper is essential for measuring and cutting the tubing to the correct length.
- Cutting Tools: A tube cutter or hacksaw is used to cut the tubing or hose to the required size. For clean cuts, make sure to use sharp tools to avoid any damage to the tubing.
- Deburring Tool: A deburring tool helps to smooth out any rough edges after cutting the tubing, which prevents leaks and ensures a proper fit.
- Safety Gear: Always wear safety glasses and gloves to protect yourself from debris and potential injuries during the installation process.
Step-by-Step Guide to Installing Swage Fittings
Now that you have the necessary tools, it’s time to walk through the installation process. Follow these steps carefully for a proper swage fitting installation:
Step 1: Preparing the Work Area and Materials
Start by setting up a clean and organized workspace. Ensure that all tools and materials are within reach. It’s also important to verify that the tubing and swage fittings are free from any dirt or debris, as this can compromise the installation and lead to leaks or other issues.
Step 2: Measuring and Cutting the Tubing or Hose
Accurate measurements are key to a successful swage fitting installation. Use a measuring tool to determine the length of tubing or hose required for your project. Once you have the correct length, mark the tubing and use a tube cutter or hacksaw to make a clean, straight cut. It’s important to avoid crushing or deforming the tubing during this process.
Step 3: Inserting the Tubing into the Fitting
Slide the tubing into the swage fitting, making sure it is fully seated. Depending on the type of fitting, you may need to push the tubing in until it reaches the bottom of the fitting. Ensure the tubing is aligned properly to prevent any misalignment or improper connections.
At this point, double-check the alignment and make sure the tubing is flush with the fitting before moving to the next step.
Step 4: Using the Swaging Tool to Secure the Fitting
Now, it’s time to use the swaging tool. This tool will compress the fitting onto the tubing to form a secure, leak-proof seal. Position the swaging tool over the fitting and tubing, ensuring proper alignment. Once in place, apply pressure to the tool to securely crimp the fitting onto the tubing. It may take several presses to fully secure the fitting.
Step 5: Inspecting the Installed Swage Fitting
After completing the installation, perform a thorough inspection of the swage fitting. Look for any signs of damage, misalignment, or incomplete swaging. Run your fingers along the edges to ensure there are no sharp edges that could cause damage or leaks. If the fitting appears secure, you’ve completed the installation successfully!
Common Mistakes to Avoid During Installation
While installing swage fittings may seem straightforward, there are several common mistakes that can lead to improper installations. These mistakes can compromise the safety and efficiency of your system, so it’s essential to be aware of them:
- Incorrect Measurement and Cutting: One of the most frequent errors is miscalculating the length of the tubing or hose. Make sure to take accurate measurements and double-check them before cutting. An inaccurate cut can result in a poor fitting and can even damage the tubing.
- Fitting Misalignment: When the tubing isn’t properly aligned within the fitting, it causes an uneven swage that might lead to leaks or a weak connection. Always ensure the tubing is fully seated and aligned before swaging.
- Using the Wrong Swaging Tool: Not all swage fittings are the same, and using the wrong tool can lead to an improper installation. Be sure to select a swaging tool that matches the size and type of fitting you are using.
- Insufficient Swaging Pressure: If you don’t apply enough pressure while using the swaging tool, the fitting won’t securely attach to the tubing. This could result in leaks under pressure. Ensure you use the appropriate force to complete the installation.
- Ignoring Safety Protocols: Swage fittings are typically used in high-pressure environments. Ignoring safety precautions, such as wearing protective gloves and goggles, can lead to accidents. Always follow safety guidelines and wear protective gear when working with swage fittings.
Best Practices for Swage Fitting Installation
To make sure your swage fitting installation is as effective and reliable as possible, follow these best practices:
- Double-Check Measurements: Before making any cuts, always double-check your measurements. Measure twice to ensure you have the correct length for the tubing or hose. This will reduce the risk of mistakes and save time during installation.
- Clean and Deburr Edges: After cutting the tubing, always clean and deburr the edges. Sharp edges or debris can prevent a secure connection and cause leaks. Use a deburring tool to smooth out the edges and remove any leftover particles.
- Ensure Proper Tool Calibration: Regularly check your swaging tools for wear and tear. Over time, tools can become miscalibrated, which could result in improper fittings. Ensure the tool you are using is in good working condition and calibrated correctly for your specific fittings.
- Inspect the Fitting Before Finalizing: After the swage fitting is installed, take a few moments to inspect it. Check for misalignment or damage to the fitting. A good inspection will help you spot any issues early before they cause problems in the system.
- Test the Installation Under Pressure: If possible, test the system under the expected operating pressure to ensure there are no leaks. This can help identify any issues before putting the system into regular use.
By following these best practices, you will ensure that your installation is secure, reliable, and long-lasting.
Safety Tips for Installing Swage Fittings
Installing swage fittings can be hazardous if proper safety precautions are not followed. Here are some important safety tips to keep in mind during installation:
- Wear Protective Gear: Always wear protective gloves and safety goggles. These will protect you from sharp tubing edges, debris, and any accidental fittings that may fly off during installation.
- Handle High-Pressure Systems with Care: Swage fittings are often used in high-pressure systems. Always make sure the system is depressurized before you begin work. If working with a pressurized system, ensure you follow proper protocols to avoid accidents.
- Work in a Well-Ventilated Area: If you’re working in a confined space or with materials that could produce fumes, ensure that the area is well-ventilated. This will help prevent inhalation of any hazardous gases or chemicals.
- Check for Leaks Before Use: After installation, it’s critical to check the swage fitting for any signs of leaks. Pressure-test the system to ensure the connection is sealed correctly. Leaks in high-pressure systems can be dangerous and lead to system failure.
- Stay Focused and Alert: Always stay focused while working with swage fittings, especially when operating the swaging tool. It’s easy to become distracted during repetitive tasks, but maintaining attention ensures safety and accuracy.
By adhering to these safety tips, you’ll be able to work confidently and minimize the risk of accidents during installation.
Maintenance and Inspection of Swage Fittings
After installing swage fittings, it’s important to regularly inspect and maintain them to ensure they continue functioning properly. Proper maintenance can help extend the lifespan of the fittings and prevent costly repairs down the road. Here are some tips for maintaining and inspecting swage fittings:
- Regular Visual Inspections: Periodically inspect the fittings for any signs of wear, such as cracks, corrosion, or loose connections. If you notice any of these issues, it’s best to replace the fitting immediately to prevent system failure.
- Check for Leaks: Leaks can develop over time due to high pressure or changes in the environment. Use a leak detection method such as a pressure test to identify any potential issues early. If leaks are found, promptly repair or replace the fitting.
- Ensure Proper Tightness: Over time, vibrations or thermal expansion and contraction can cause fittings to loosen. Periodically check the tightness of the fittings and re-tighten them if necessary. However, avoid overtightening, as this could damage the fitting.
- Replace Damaged Fittings: If any fitting becomes damaged or shows signs of stress, it’s essential to replace it immediately. Continuing to use a compromised fitting could lead to leaks, system inefficiencies, or even catastrophic failure.
Routine maintenance and inspection of your swage fittings will ensure the reliability and longevity of your system. Always keep a close eye on the condition of your fittings, particularly in high-pressure applications.
Benefits of Using Swage Fittings
Swage fittings offer several advantages over other types of fittings, making them a popular choice in many industries. Here are some of the key benefits:
- Secure and Leak-Proof Connections: Swage fittings form a tight, permanent connection between the tubing and fitting, which helps prevent leaks. This is especially important in high-pressure systems where leaks could lead to safety hazards.
- Durability: Swage fittings are designed to withstand high-pressure environments, vibrations, and other stresses. This makes them ideal for applications where long-lasting performance is crucial.
- Cost-Effective: Compared to other types of fittings, swage fittings are relatively inexpensive and easy to install. This makes them a cost-effective choice for both small and large-scale projects.
- Versatility: Swage fittings can be used with a wide range of tubing materials, including stainless steel, copper, and plastic. This makes them suitable for many different industries, from plumbing to automotive to aerospace.
- Ease of Installation: With the right tools and a bit of practice, installing swage fittings can be a quick and easy process. This reduces the overall time and labor required for system assembly.
These benefits make swage fittings an excellent choice for a variety of applications, especially when durability, security, and cost-effectiveness are top priorities.
Conclusion
Installing swage fittings may seem like a small task, but it plays a crucial role in ensuring the integrity and safety of a system. By following the proper installation steps, using the right tools, and adhering to best practices, you can ensure correct installation and reliable function of your swage fittings for years to come.
Remember to maintain and inspect your fittings regularly, and address any issues as soon as they arise to prevent potential failures. Whether you’re working on a simple plumbing system or a high-pressure industrial setup, swage fittings provide a secure, durable, and cost-effective solution.
By following the guidelines and tips provided in this blog, you’ll be able to complete a successful swage fitting installation and enjoy the many benefits these fittings offer.
FAQs
1. What is the difference between swage fittings and compression fittings?
Swage fittings and compression fittings both create secure connections between pipes or hoses, but they are installed differently. Swage fittings use a swaging tool to permanently attach, while compression fittings rely on a ferrule that tightens around the tubing. The connection made by swage fittings is stronger and leak-proof, which makes them ideal for high-pressure systems.
2. Can swage fittings be used for both hydraulic and pneumatic systems?
Yes, swage fittings are commonly used in both hydraulic and pneumatic systems. Their ability to withstand high pressure and form a permanent seal makes them suitable for these applications. However, it’s important to ensure you’re using the correct type of swage fitting for the specific requirements of your system.
3. How do I know if my swage fitting installation is secure?
The best way to ensure that your swage fitting installation is secure is to perform a pressure test. After installation, pressurize the system and check for leaks. If there are no leaks and the fitting holds under pressure, it’s a sign that the installation is secure.
4. Are there any special tools required for installing swage fittings?
Yes, installing swage fittings requires a specific swaging tool that matches the size and type of the fitting you’re using. These tools apply the necessary pressure to secure the fitting onto the tubing or hose. Ensure you use the correct swaging tool for the best results.
5. Can swage fittings be removed and reused?
Swage fittings are generally designed for a one-time use. Once they’ve been swaged onto the tubing, the connection is permanent, and the fitting should not be reused. Attempting to remove and reuse a swage fitting can compromise the integrity of the connection, leading to leaks or system failure.


