Introduction
Hydraulic systems are the lifeline of modern machinery used in construction, agriculture, aerospace, and manufacturing. At the core of these systems are hydraulic fittings—components responsible for connecting various system parts while maintaining a sealed, high-pressure environment. Leaks and pressure inconsistencies can lead to system inefficiency, costly repairs, and even catastrophic failures. Understanding how to test hydraulic fittings for leaks and pressure is not just a maintenance task; it’s an essential skill that ensures operational safety, minimizes downtime, and extends equipment lifespan. This comprehensive guide walks you through the most effective methods, tools, and safety protocols for accurate and reliable testing.
What Are Hydraulic Fittings?
Definition and Role in Hydraulic Systems
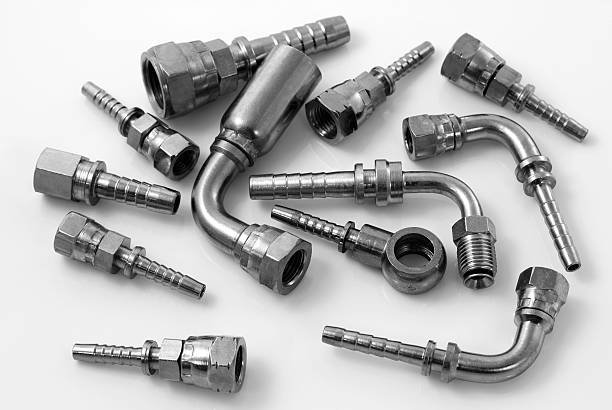
Hydraulic fittings are mechanical connectors used to join sections of hose, pipe, or tubing within a hydraulic system. Their primary function is to provide leak-proof seals that can withstand high levels of pressure and prevent fluid contamination. These components must meet specific standards for durability, compatibility, and performance under extreme operating conditions.
Common Types of Hydraulic Fittings
- Threaded Fittings: These are the most common and are tightened using threads. They include NPT, BSP, and UNF threads.
- Flange Fittings: Used for high-pressure applications, flanged connections use bolts and O-rings to create a seal.
- Quick-Connect Fittings: Designed for fast and tool-free connection/disconnection, typically used in mobile equipment.
- Compression Fittings: These use a ferrule to compress around the pipe or tubing, ensuring a tight seal, often seen in instrumentation.
Importance of Leak and Pressure Testing
Why Leak Testing is Crucial
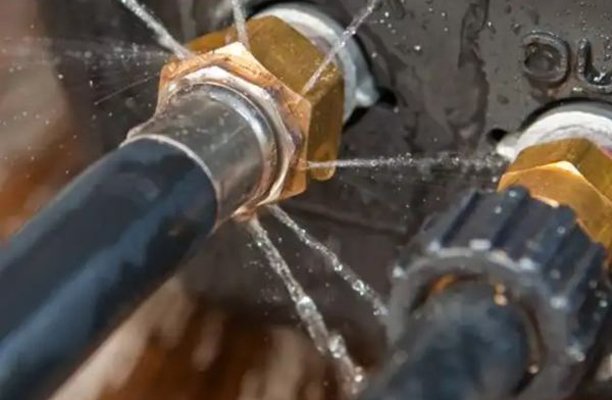
Undetected hydraulic leaks may appear minor at first but can escalate quickly. Fluid leakage leads to reduced system pressure, inefficient performance, environmental hazards, and safety risks. Leaks can also cause hydraulic fluid to come into contact with hot surfaces or electrical components, increasing fire hazards. Regular leak testing helps you identify problems before they compromise the entire system.
Pressure Testing and System Reliability
Pressure testing is the process of verifying that the hydraulic system, and particularly its fittings, can handle the operational pressures without bursting or deforming. Over time, high-pressure cycles can weaken fittings, leading to failure. Pressure testing ensures components are structurally sound, aligned with system requirements, and free from manufacturing defects. It’s especially important after system installation, component replacement, or maintenance activities.
Common Causes of Leaks in Hydraulic Fittings
1. Wear and Tear
Over time, all hydraulic systems are subjected to mechanical wear. Seals become brittle, threads can strip or deform, and the fittings themselves may corrode—especially when exposed to contaminants or incompatible fluids. Repeated pressurization cycles contribute to this gradual degradation, making ongoing inspections and proactive testing a necessity.
2. Improper Installation
One of the most common sources of hydraulic leaks is human error during installation. This includes:
- Incorrect torque application—either too tight (causing thread damage) or too loose (resulting in leaks).
- Misaligned fittings—creating uneven seal surfaces.
- Omission of required seals, washers, or thread sealants.
Even high-quality fittings will leak if they are not installed according to manufacturer specifications. This underscores the importance of using torque wrenches and certified technicians during assembly.
3. Material Fatigue and Environmental Factors
Fittings made from inferior materials or exposed to extreme environments—such as high heat, chemical exposure, or saltwater—can suffer premature failure. Repeated thermal expansion and contraction may loosen fittings, while corrosion can eat into sealing surfaces, making them porous and prone to leaks. In systems subject to high vibration, fatigue cracking is also a major concern.
Safety Precautions Before Testing
1. Wear Proper Personal Protective Equipment (PPE)
Hydraulic systems can operate at pressures exceeding 3,000 PSI. A sudden spray of fluid from a leak can puncture skin, causing what’s known as injection injuries, which are medical emergencies. Always wear:
- Safety goggles or face shields
- Gloves resistant to hydraulic fluid
- Long-sleeved clothing and steel-toed boots
2. Depressurize the System
Before beginning any leak or pressure test, it’s critical to fully depressurize the hydraulic system. This involves:
- Turning off the hydraulic pump or engine
- Activating all system controls to release residual pressure
- Opening manual bleed valves if present
Skipping this step can result in sudden fluid discharge when fittings are disconnected or inspected, creating a serious safety hazard.
3. Inspect in a Controlled Environment
Whenever possible, conduct testing in a clean, well-ventilated area away from active machinery. Ensure your workspace is dry to prevent slips and free of electrical hazards, especially when using electronic leak detection equipment. Use barriers or shields if high-pressure testing is to be done.
Tools Required for Testing
Leak Detection Tools
- Soapy Water Solution: A classic method where a mix of water and dish soap is sprayed onto the fittings. Bubbling indicates the presence of a leak.
- UV Dye and Blacklight: Specially formulated dyes are added to the hydraulic fluid. When exposed to UV light, even the tiniest leak points become visible.
- Electronic Leak Detectors: These tools use ultrasonic sensors to detect the high-frequency sound waves emitted by pressurized fluid escaping through a small gap.
Pressure Testing Equipment
- Hydraulic Test Gauge: A dial or digital meter used to read system pressure at various test points. Look for models rated for your system’s PSI range.
- Test Pumps: Manual or powered pumps that allow technicians to simulate real-world operating pressures without activating the full system.
- Digital Pressure Monitors: These offer precise readings and can log data over time for trend analysis or troubleshooting recurring issues.
Additional Support Tools
- Torque Wrenches: For installing fittings with manufacturer-recommended force.
- Thread Sealants and Tapes: Prevent leaks in threaded connections—ensure compatibility with hydraulic fluid types.
- O-ring Pick Sets and Seal Kits: Essential for replacing damaged or aged seals during repairs.
Step-by-Step Guide to Leak Testing
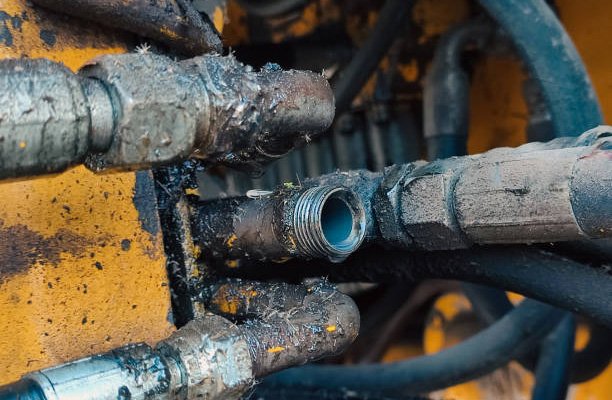
1. Conduct a Visual Inspection
Before using any tools, perform a thorough visual check of the hydraulic fittings and surrounding components. Look for:
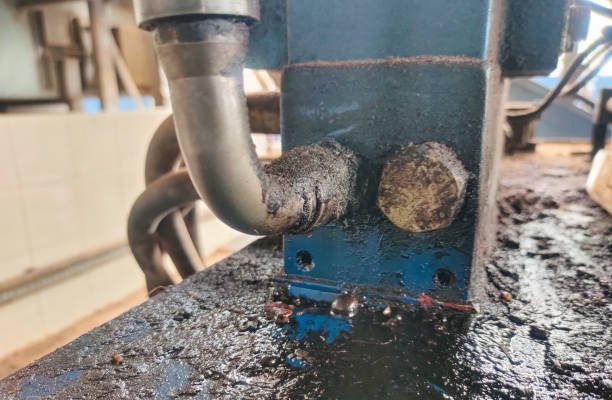
- Wet spots or fluid accumulation around connections
- Darkened or discolored areas indicating dried hydraulic fluid
- Corrosion or rust on metal fittings
- Dust or dirt build-up sticking to fluid residue
This basic but essential step can identify obvious leaks or compromised fittings before moving on to more technical tests.
2. Apply Soapy Water Solution
This method is simple, affordable, and effective for low-pressure systems or early diagnostics:
- Mix water with dish soap in a spray bottle.
- Lightly pressurize the hydraulic system to operating levels.
- Spray the solution generously around all fittings and joints.
- Observe closely—if bubbles form or grow, there is a leak present at that point.
This technique is especially useful for identifying leaks in compressed air or hydraulic lines where a visible fluid spray might not be evident.
3. Use UV Dye and Blacklight
For detecting slow or micro-leaks in high-pressure systems, UV dye testing is a highly accurate approach:
- Add the manufacturer-approved fluorescent dye to the hydraulic fluid reservoir.
- Operate the system under normal pressure for at least 15–30 minutes to circulate the dye.
- Turn off the system, depressurize it, and inspect all fittings using a UV lamp or blacklight.
- Any leaks will glow under the light, allowing you to pinpoint even the smallest fluid seepage.
This method is especially beneficial for enclosed or hard-to-reach hydraulic assemblies where visual inspections alone are insufficient.
Step-by-Step Guide to Pressure Testing
1. Connect the Pressure Gauge
Begin by identifying a designated test port or safe connection point near the fitting being tested. Follow these steps:
- Ensure the system is shut off and depressurized.
- Attach a pressure test gauge or digital pressure monitor using a compatible coupler.
- Tighten the connection securely using a torque wrench, ensuring a leak-proof seal.
Verify that the gauge used is calibrated and rated above the maximum operating pressure of the system.
2. Gradually Increase System Pressure
With the gauge securely in place, initiate a controlled pressure test:
- Use a manual hydraulic test pump or activate the system slowly.
- Increase pressure in increments, pausing at key thresholds (e.g., 25%, 50%, 75%, 100% of system operating pressure).
- Monitor the fittings visually and listen for abnormal noises like hissing or popping.
Sudden spikes in pressure or fluid discharge indicate a faulty fitting or seal that must be addressed immediately.
3. Stabilize and Monitor Pressure Readings
Once the target pressure is reached, maintain the system in a stable state:
- Allow the system to remain pressurized for 15–30 minutes.
- Observe the gauge to ensure the pressure does not drop.
- Record initial and final pressure readings for comparison.
A consistent pressure reading suggests that all fittings are properly sealed and capable of withstanding operational loads.
Interpreting Test Results
1. Identifying Leaks Based on Observations
During leak testing, the following signs indicate a failing or compromised hydraulic fitting:
- Bubbles from soapy water application
- UV dye marks visible under blacklight
- Visible fluid drips or mist near the fitting
- Noise or vibration from pressure escaping
Even minor leaks should be addressed immediately to prevent system-wide inefficiencies and safety hazards.
2. Understanding Pressure Stability
In pressure testing, an ideal result involves zero pressure loss over the testing period. Acceptable pressure drops depend on system specifications, but general guidelines are:
- No pressure drop: Indicates optimal fitting integrity
- Slow, minimal drop: May indicate minor seal degradation or thermal contraction
- Rapid drop: Signals a clear leak or burst-risk fitting requiring replacement
3. Documenting Results for Maintenance Logs
Always document test outcomes, even when no issues are found. Include:
- Date and time of testing
- Pressure levels applied
- Tools and methods used
- Leak points identified (if any)
- Corrective actions taken
Maintaining these logs supports predictive maintenance and regulatory compliance in industrial environments.
Fixing and Retesting Problem Areas
1. Tightening or Replacing Fittings
Once a leak or pressure drop is identified, the next step is corrective action. Begin with tightening the affected fitting using a calibrated torque wrench. Refer to the manufacturer’s torque specifications to avoid overtightening, which can deform threads or crush O-rings. If the leak persists after retightening:
- Disconnect the system and inspect the fitting for visible damage.
- Replace any cracked, worn, or corroded fittings with certified replacements.
- Ensure replacement fittings match the pressure rating, material compatibility, and thread type of the original system design.
2. Resealing Threaded Connections
Improper sealing is a frequent cause of leaks in threaded connections. Depending on the system and fitting type, use:
- Thread Sealant: Apply liquid thread sealant designed for high-pressure hydraulic applications. Avoid overtightening, which can cause sealant extrusion.
- PTFE Tape: Wrap two to three turns clockwise around the male threads for low- to medium-pressure fittings. Ensure no tape overlaps the port opening, which could contaminate the fluid.
Once resealed, reassemble the connection and repeat leak and pressure tests to confirm effectiveness.
3. Retesting After Repairs
After repairs or component replacement, always perform both leak detection and pressure testing again:
- Repeat the same procedure used initially to ensure consistency.
- Verify that the system can maintain stable pressure for at least 15–30 minutes without fluid loss or pressure drop.
- Document all changes, including parts replaced and final test results, in the maintenance log.
Best Practices for Routine Maintenance
1. Implement a Preventive Maintenance Schedule
To avoid unplanned downtime and extend the life of your hydraulic system, establish a preventive maintenance routine. Include the following intervals:
- Weekly: Visual inspections for obvious leaks and hose wear
- Monthly: Soapy water leak tests on critical fittings
- Quarterly: Full pressure testing and UV dye inspections
- Annually: Replacement of high-wear fittings, hoses, and seals
Routine attention helps detect early signs of degradation and prevents small issues from escalating into costly failures.
2. Train Personnel on Inspection Techniques
Consistent testing and maintenance practices start with well-trained technicians. Conduct hands-on training sessions that cover:
- Proper use of pressure gauges and leak detection tools
- How to read pressure logs and identify abnormal patterns
- Best practices for installing and replacing hydraulic fittings
Certified training not only improves safety but also boosts the accuracy and efficiency of your hydraulic system management.
3. Keep Maintenance Logs and Inspection Reports
Digital or manual logging of all inspections and test outcomes is critical for regulatory compliance and operational accountability. A well-maintained log should include:
- Date and technician name
- Test methods used
- Fittings tested and results
- Parts replaced and torque specifications
This historical data can help identify patterns, inform replacement schedules, and provide critical documentation for audits or insurance claims.
Advanced Testing Methods
1. Hydrostatic Testing
This method involves filling the hydraulic system or a section of it with incompressible fluid—typically water or oil—and pressurizing it well beyond normal operating conditions (often 1.5x to 2x the standard pressure) to check for structural integrity. Steps include:
- Isolate the segment of the system to be tested.
- Fill it slowly with fluid while bleeding air out.
- Apply pressure gradually using a test pump until the target level is reached.
- Hold pressure and observe for leaks or deformations for a specific period (usually 15–60 minutes).
Hydrostatic testing is often used for pressure vessels, critical piping, and large-scale hydraulic infrastructure installations.
2. Burst Testing
This destructive method involves pressurizing a fitting or component until it fails. It is used during manufacturing and certification rather than regular maintenance. Burst testing helps determine:
- The maximum pressure a fitting can withstand before catastrophic failure
- Weak points in fitting design or materials
- Quality control in mass production
Never attempt burst testing in the field unless in a controlled laboratory or testing facility with all safety precautions in place.
3. Digital Pressure Profiling
Advanced systems now use IoT-enabled pressure sensors that log real-time data across multiple points in the hydraulic circuit. These devices can:
- Track pressure fluctuations throughout operating cycles
- Alert operators to abnormal drops or spikes in pressure
- Integrate with predictive maintenance software for automated diagnostics
Digital pressure profiling provides deep insights into system health and helps proactively schedule maintenance, minimizing unplanned downtime.
When to Call a Professional
1. Persistent Leaks Despite Repairs
If leaks continue after tightening, resealing, or replacing hydraulic fittings, the issue may be more complex than a surface-level defect. Professionals have access to advanced diagnostic tools such as thermal imaging, ultrasonic leak detectors, and high-resolution pressure mapping, allowing them to uncover hidden faults within the system.
2. Critical Applications or High-Risk Systems
In environments such as aerospace, defense, nuclear, or heavy industrial equipment, the margin for error is virtually zero. In such scenarios, testing should only be performed by certified hydraulic technicians with relevant industry experience and access to lab-grade equipment.
3. Lack of In-House Tools or Expertise
If your team lacks the proper testing gauges, sealants, or knowledge of industry specifications (such as SAE, ISO, or DIN standards), hiring a qualified service provider is the safest and most efficient option. This ensures that fittings are tested, repaired, and retested to meet legal and safety compliance requirements.
Conclusion
Understanding how to test hydraulic fittings for leaks and pressure is not just a matter of maintenance—it’s a critical component of safe, efficient hydraulic system management. By following a structured process involving visual inspections, soapy water tests, UV dye analysis, and pressure gauge monitoring, technicians can reliably detect and address issues before they escalate.
Whether you’re a fleet manager, facility operator, or machinery technician, investing in proper testing protocols pays off through increased uptime, longer equipment life, and enhanced workplace safety. With routine testing, proper tools, and timely professional intervention when needed, your hydraulic system can operate at peak performance with minimal risk.
FAQs
1. How often should hydraulic fittings be tested for leaks and pressure?
It depends on usage conditions, but monthly visual checks and quarterly full tests are recommended for most industrial systems. High-pressure or mission-critical systems may require more frequent inspections.
2. Can hydraulic fittings be reused after a leak?
Some fittings can be reused if the threads and sealing surfaces are undamaged. However, it’s generally safer to replace them, especially if the leak was due to fatigue or corrosion.
3. What pressure range should be used for hydraulic pressure testing?
The test pressure typically ranges from 1.0 to 1.5 times the system’s normal operating pressure, depending on the component and testing standard. Always follow manufacturer guidelines and industry codes.
4. Is electronic leak detection better than traditional methods?
Electronic detection is more sensitive and faster for identifying micro-leaks or leaks in complex systems. However, traditional methods like soapy water and UV dye are still highly effective and more accessible for most applications.
5. Can improper torque cause leaks even if fittings are new?
Yes. Over-tightening can distort the fitting or damage threads, while under-tightening may prevent a proper seal. Always use a calibrated torque wrench and follow manufacturer torque specifications.

