Compression fittings are commonly used in plumbing systems to create a secure, leak-proof connection between pipes or tubing. While they’re incredibly handy for installations, removing them when repairs or replacements are needed can leave many scratching their heads. Fear not! Whether you’re a seasoned DIYer or just getting your hands dirty for the first time, this guide will walk you through the process with ease.
Let’s dive into what compression fittings are, why they’re used, and—most importantly—how you can remove them without causing any damage.
What is a Compression Fitting?
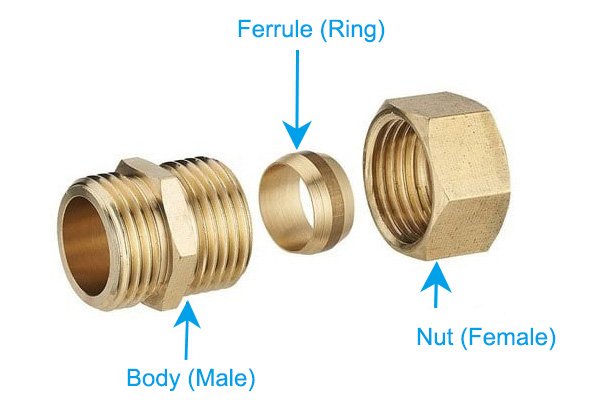
A compression fitting connects two pipes or tubing using a nut, ferrule (also known as an olive), and a fitting body. They’re common in water supply lines, gas lines, and even some appliances. What makes compression fittings so popular is their ease of installation—no soldering or adhesives are required, just a snug fit tightened with a wrench.
However, the same snug fit that makes them secure can make them tricky to remove!
When to Remove a Compression Fitting
Not sure if it’s time to remove a compression fitting? Here are some common signs that removal is necessary:
- Leaking Water or Gas:
If you notice leaks around the compression fitting, it could indicate that the ferrule or nut has worn out, or the fitting wasn’t properly installed in the first place. - Corrosion or Damage:
Over time, fittings can corrode or become damaged, especially in older systems or environments with hard water. This damage can weaken the fitting and lead to failure. - Upgrading or Replacing Plumbing Fixtures:
If you’re installing a new appliance, faucet, or pipe system, you might need to remove old fittings to accommodate the upgrades. - Poor Sealing:
When the seal fails and water drips, it often points to a compression fitting that has loosened over time or wasn’t properly tightened initially. - Pipe Replacement:
If the connected pipe has cracks, dents, or rust, you’ll likely need to replace both the pipe and the compression fitting. - Improper Installation:
If the fitting was installed incorrectly—whether cross-threaded, over-tightened, or using mismatched components—it’s better to replace it for long-term reliability.
Why Removal Might Be Necessary
Understanding why you’re removing a compression fitting is crucial for avoiding unnecessary damage to your plumbing or wasting time. Here are the most common reasons for removal:
- To Fix Leaks or Malfunctions:
Compression fittings rely on tight seals to prevent leaks. Over time, the ferrule can deform or the nut can loosen, requiring repair or replacement. - For Maintenance or Upgrades:
Whether you’re replacing a water heater, installing new kitchen faucets, or upgrading your pipes, removing old compression fittings is often the first step in the process. - Preventing Future Problems:
If you notice corrosion or wear on the fitting, removing and replacing it now can prevent larger problems down the road, such as burst pipes or water damage. - For Inspection or Cleaning:
Compression fittings can sometimes become clogged with sediment or buildup, especially in hard water systems. Removing and cleaning them can restore proper flow. - To Replace Worn or Outdated Components:
Fittings, ferrules, and nuts wear out over time. Removing and replacing them ensures your plumbing system remains secure and leak-free.
Tools You’ll Need
Before removing a compression fitting, be sure you have the following tools ready:
- Adjustable wrench or two crescent wrenches
- Compression sleeve puller (optional but useful for stuck ferrules)
- Teflon tape (if reinstalling a fitting)
- Bucket or towel (to catch any drips)
- Pipe cutter (if you’re replacing damaged sections of pipe)
Step-by-Step Instructions for Removing a Compression Fitting
Ready to get started? Here’s a step-by-step breakdown to remove that pesky compression fitting.
Step 1: Turn Off the Water Supply
Before you touch any plumbing, shut off the water supply to the affected pipe or fixture. This step will prevent flooding or unwanted messes. You can usually find the valve near the water source or along the pipe line.
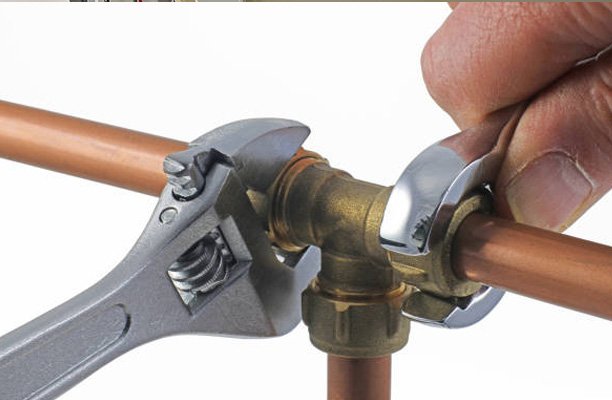
Step 2: Loosen the Compression Nut
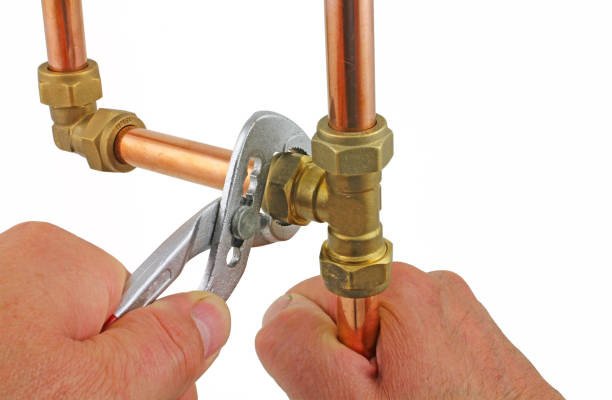
Using an adjustable wrench, grip the compression nut and begin turning it counterclockwise. You may need a second wrench to hold the fitting body steady while you loosen the nut.
Pro Tip: If the nut is stuck, spray it with a bit of penetrating oil or give it a light tap with a hammer to break the seal.
Step 3: Remove the Compression Nut and Ferrule
Once the nut is loose, slide it back along the pipe to expose the ferrule (the small ring that creates the watertight seal). Sometimes the ferrule can stick to the pipe, so don’t force it!
Here’s where a compression sleeve puller comes in handy. This tool is designed to slide under the ferrule and gently remove it without damaging the pipe.
If you don’t have a puller, you can try carefully prying it off with pliers. Just go slow to avoid scoring or denting the pipe.
Step 4: Inspect the Fitting and Pipe
Once the compression fitting is removed, inspect the pipe for damage or debris. If the pipe is nicked, scratched, or bent, it’s a good idea to cut out the damaged section and replace it with a new pipe.
Step 5: Clean Up and Prepare for Reinstallation (If Needed)
If you’re planning to reinstall a compression fitting, clean the pipe thoroughly to ensure a proper seal. Use fine sandpaper or a pipe cleaning tool to remove any leftover residue or debris.
Reinstall the compression fitting by reversing the steps above. Remember to use Teflon tape or thread sealant for an extra layer of protection against leaks.
Preventing Damage to Pipes During Compression Fitting Removal
Removing a compression fitting can sometimes risk damaging your pipes, but a few simple precautions can help you avoid costly repairs.
- Use the Right Tools: Invest in a compression sleeve puller for safely removing ferrules without scratching or denting the pipe. Pair it with adjustable wrenches for loosening the nut without stressing the pipe.
- Work Slowly: Take your time loosening the nut and avoid using excessive force. If the fitting is stuck, use penetrating oil or heat to break the seal.
- Protect the Pipe Surface: Wrap the pipe with a cloth or rubber padding to prevent scratches or dents when gripping it with tools.
- Inspect the Pipe Post-Removal: Check for scratches, bends, or cracks after removing the fitting. Replace damaged sections if necessary to maintain a secure, leak-free system.
- Cut the Pipe as a Last Resort: If the ferrule is stuck, use a pipe cutter to cleanly remove the section below the fitting, and deburr the edges for a smooth finish.
Tips for a Smooth Removal Process
Removing a compression fitting doesn’t have to be a hassle. Here are some expert tips to make the job easier:
- Use a Compression Sleeve Puller:
This tool is a game-changer for safely removing ferrules. It prevents damage to the pipe, saving you time and effort. - Don’t Skip the Shut-Off Valve:
Always turn off the water or gas supply before starting. Even small leaks can lead to major headaches. - Work Slowly and Carefully:
Applying too much force or rushing the process can damage the pipe or fitting. Patience is key! - Have Spare Parts Ready:
Always keep spare nuts, ferrules, and fittings on hand. If the old ones are too worn or damaged to reuse, you’ll be prepared. - Inspect for Rust or Corrosion:
After removing the fitting, check for signs of rust or corrosion on both the fitting and the pipe. Replace any compromised components.
Conclusion
Compression fittings are a fantastic plumbing solution, but like all components, they have their limits. Whether you’re dealing with a leak, upgrading your system, or performing maintenance, knowing how and when to remove a compression fitting is a vital skill for any DIYer or homeowner.
By recognizing the signs that a fitting needs removal, understanding the reasons behind it, and following the step-by-step instructions and tips in this guide, you’ll save yourself time, frustration, and potentially costly repairs.
FAQs
1. Can I reuse a compression fitting after removal?
Yes, you can reuse the nut and fitting body if they’re in good condition. However, it’s often best to replace the ferrule to ensure a tight seal.
2. How do I remove a stuck ferrule?
A compression sleeve puller is the best tool for this. If you don’t have one, you can carefully cut the ferrule with a fine-toothed hacksaw, but be cautious not to damage the pipe.
3. Can compression fittings fail over time?
Yes, they can. Over time, the ferrule may deform, or the nut may loosen, leading to leaks. Regular inspections can help catch these issues early.
4. What’s the easiest way to tell if a compression fitting is leaking?
Look for visible water or gas around the fitting. In some cases, you may hear a hissing sound if it’s a gas line.
5. Is it okay to overtighten a compression fitting?
No! Over-tightening can damage the fitting, deform the ferrule, or even crack the pipe, leading to more issues down the road.


