Introduction
Grease fittings, also known as Zerk fittings, are essential components in machinery, vehicles, and heavy equipment. They allow for the smooth and efficient delivery of lubricant to internal moving parts, significantly extending the life of components. Over time, however, these fittings can become clogged, damaged, or worn out, resulting in poor lubrication and potential mechanical failure.
This comprehensive guide will walk you through how to recognize when a grease fitting needs replacement and how to properly remove and install a new one. Whether you’re a seasoned mechanic or a DIY enthusiast, following the right steps can save time, money, and equipment downtime.
What Is a Grease Fitting (Zerk Fitting)?

A grease fitting, commonly called a Zerk fitting, is a small metal nipple installed in mechanical components that allows grease to be applied under pressure using a grease gun. This ensures lubricant reaches the bearings or other critical areas that need it.
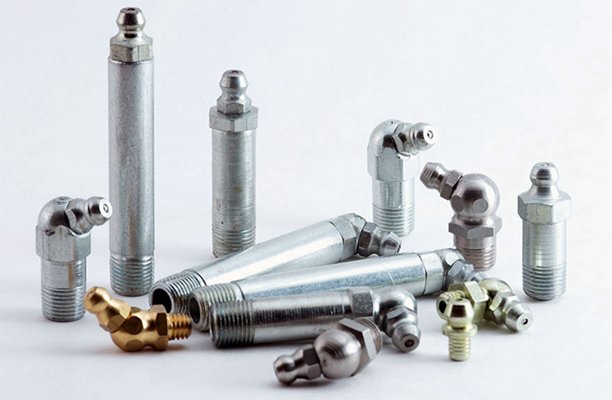
There are several types of grease fittings available, including:
- Straight fittings – Most common and ideal for accessible locations.
- Angled fittings – Useful in tight or hard-to-reach spaces.
- Flush fittings – Sit nearly flat against the surface and require a special adapter.
These fittings are typically made of steel, brass, or stainless steel, depending on the application and environmental conditions.
Signs Your Grease Fitting Needs Replacement
Knowing when to replace a grease fitting is essential to maintaining the health of your machinery. Look out for the following signs:
- Clogged or blocked fitting: If grease doesn’t flow despite pressure from the grease gun, the fitting might be clogged with dirt or hardened grease.
- Leaking grease: Leaks around the fitting may indicate wear or thread damage.
- Visible rust or corrosion: Rust weakens the integrity of the fitting and may contaminate the lubricant.
- Grease bypassing the fitting: If grease seeps out around the fitting instead of entering the component, the seal may be compromised.
- Physical damage: Cracks, stripped threads, or a missing cap are all signs it’s time to replace the fitting.
Tools and Materials You’ll Need
Before starting the replacement process, gather all the necessary tools and materials to ensure a smooth and efficient job. Here’s what you’ll need:
- Grease gun: Essential for testing the old and new fittings.
- Replacement grease fitting: Match the size and type (thread and angle) of the existing fitting.
- Wrenches or socket set: For loosening and tightening the fittings.
- Grease fitting removal tool: Optional but helpful for stripped or stubborn fittings.
- Cleaning rags or shop towels: To wipe down surfaces and remove old grease or debris.
- Degreaser or cleaning solution: For thoroughly cleaning the area before and after replacement.
- Thread sealant or Teflon tape (if needed): Helps prevent leakage and ensures a secure fit.
Having everything on hand before you begin will minimize delays and make the process much easier.
Safety Precautions Before You Start
Like with any mechanical maintenance, safety comes first. Grease fitting replacement may seem simple, but it still involves working with tools, moving parts, and pressurized systems. Follow these safety precautions:
- Wear gloves: Protects your hands from grease, debris, and sharp edges.
- Use safety glasses: Shields your eyes from flying debris or pressurized grease spray.
- Ensure the equipment is off: Never perform maintenance on a machine while it’s running or powered.
- Work in a well-ventilated area: Especially important when using cleaning chemicals or degreasers.
- Use jack stands or blocks if applicable: If you’re working under a vehicle or machine, secure it properly to avoid accidents.
Following these precautions ensures a safe and efficient replacement process.
Step-by-Step Process to Remove a Damaged Grease Fitting
Once you’ve gathered your tools and taken proper safety steps, you’re ready to remove the damaged or clogged fitting. Follow these steps:
- Locate the fitting: Identify the grease fitting in question. Wipe off any grease or dirt to get a clear view.
- Clean the area: Use a rag and degreaser to clean around the fitting. This prevents debris from entering the bearing or component when the fitting is removed.
- Remove the fitting: Using a wrench or grease fitting removal tool, turn the fitting counterclockwise. If it’s stuck, apply penetrating oil and let it sit for a few minutes before trying again.
- Inspect the threads: After removal, check the threads on the housing for damage. Clean them gently with a small brush or cloth.
With the old fitting removed and the area prepped, you’re ready to install the new one.
How to Install a New Grease Fitting
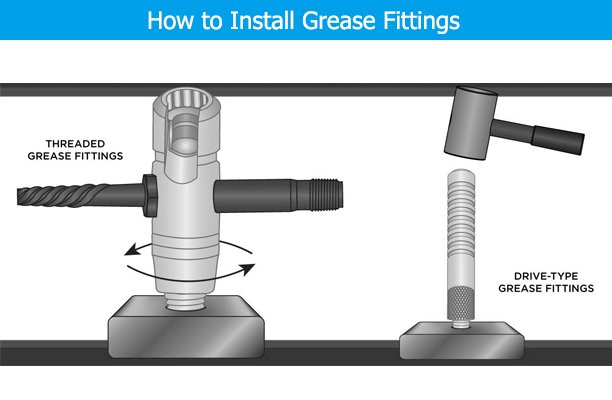
Now that the old fitting has been removed and the area cleaned, it’s time to install the new grease fitting. Follow these simple steps to ensure a secure and effective installation:
- Choose the correct fitting: Match the thread type and size exactly with the original. Consider the angle (straight, 45°, or 90°) based on your space constraints.
- Apply thread sealant (if applicable): Use a small amount of thread sealant or Teflon tape on the threads to prevent leaks and ensure a tight seal. Avoid over-application, which could contaminate the grease path.
- Thread in by hand: Carefully align the fitting and turn it clockwise by hand to avoid cross-threading.
- Tighten with a wrench: Use a wrench to snug the fitting. Avoid over-tightening, which could strip the threads or crack the housing.
Once installed, visually inspect to ensure it’s seated correctly and ready for greasing.
How to Test the New Fitting
Testing the new grease fitting is crucial to confirm proper installation and ensure the component is receiving lubricant. Here’s how to do it:
- Connect the grease gun: Attach the grease gun securely to the new fitting. Make sure the coupler locks in place to prevent leaks.
- Pump the grease: Slowly apply pressure and pump grease into the fitting. Watch closely as grease begins to flow into the component.
- Check for proper flow: If grease comes out of relief points or begins to seep around the fitting, it means the fitting is working properly.
- Inspect for leaks: Ensure no grease is escaping from the threads or base of the fitting.
If everything looks good, clean up any excess grease and move on to routine maintenance or other fittings.
Troubleshooting Installation Issues
If the grease fitting doesn’t work properly after installation, there may be underlying issues. Here are common problems and solutions:
- Fitting won’t tighten: This could be due to mismatched threads or damaged housing. Remove the fitting and recheck the thread type and size.
- Grease still won’t flow: The passage inside the component may be blocked. Use a grease fitting cleaner or try removing any internal obstructions with a small wire.
- Stripped threads: If the housing threads are stripped, you may need to use a thread repair kit or install a larger fitting if possible.
- Incorrect fitting type: Make sure the angle and length of the fitting allow for proper gun attachment and clearance.
Troubleshooting early helps avoid larger mechanical failures and ensures optimal performance from your lubrication system.
Maintenance Tips to Prolong Grease Fitting Life
Regular maintenance not only extends the life of your grease fittings but also ensures that your machinery runs efficiently. Follow these tips to get the most out of your fittings:
- Follow a regular greasing schedule: Consistent lubrication helps prevent build-up and keeps internal passages clear.
- Keep fittings clean: Wipe fittings before and after greasing to prevent dirt and contaminants from entering the system.
- Replace missing caps: Always ensure grease fittings are covered with protective caps to block out dust, moisture, and debris.
- Inspect periodically: Regularly check for signs of wear, corrosion, or blockage.
- Use quality grease: Invest in high-quality lubricants that are appropriate for your equipment and environment.
Proactive care not only saves you from costly repairs but also improves the overall efficiency of your equipment.
Choosing the Right Grease Fitting for Your Equipment
Selecting the correct grease fitting ensures compatibility, safety, and optimal performance. Here’s what to consider:
- Thread size and type: Common thread standards include SAE (Society of Automotive Engineers), metric, and NPT (National Pipe Thread). Always match the fitting to the existing thread.
- Fitting angle: Choose between straight, 45°, and 90° angles based on clearance and ease of access.
- Material: Use brass or stainless steel fittings in corrosive environments for longer durability.
- OEM vs aftermarket: OEM (original equipment manufacturer) fittings guarantee compatibility, while aftermarket options offer cost flexibility — just ensure they’re from reputable brands.
Take your time to match specifications, especially when replacing fittings on high-performance or heavy-duty machinery.
When to Seek Professional Help
While replacing a grease fitting is typically a straightforward task, there are situations where professional assistance is necessary:
- Damaged or stripped housing threads: If the threads in the component are compromised, a professional may need to repair or re-tap them.
- Inaccessible fittings: Some fittings are located in hard-to-reach areas and require specialized tools or equipment to access safely.
- Recurring clogs or grease flow issues: Consistent blockages could indicate deeper internal lubrication problems that need expert diagnosis.
- Heavy equipment or high-stakes machinery: When working on critical systems like aircraft, industrial automation, or medical devices, always defer to a trained technician.
Knowing when to call in an expert helps avoid accidental damage and ensures your machinery continues to operate safely and efficiently.
Cost of Replacing Grease Fittings
Replacing a grease fitting is generally inexpensive and can save hundreds or even thousands in potential repair costs. Here’s a breakdown of what to expect:
- Individual grease fittings: Typically range from $1 to $5 each, depending on size, material, and brand.
- Grease fitting kits: A full assortment can cost between $10 and $40, offering various thread types and angles.
- Grease gun: Manual grease guns range from $20 to $50, while pneumatic or battery-powered models can exceed $100.
- Thread sealant or tape: Usually under $10 and can be used for multiple fittings.
- Professional labor (if needed): Mechanic shop rates vary but may charge $50–$100 per hour.
For most DIYers, replacing a grease fitting is a low-cost maintenance task with a high return on equipment longevity.
Common Mistakes to Avoid
Even a simple task like replacing a grease fitting can go wrong without proper care. Avoid these common errors:
- Over-tightening: This can strip the threads or crack the housing, leading to leaks or failure.
- Using the wrong thread type: Mixing SAE and metric threads can cause cross-threading and damage.
- Skipping cleaning: Failure to clean the area can push contaminants into the lubrication system.
- Ignoring fitting angles: Using a straight fitting in a tight space may make greasing impossible.
- Not testing after installation: Always verify grease flow before finishing the job.
Attention to detail helps prevent mistakes that could cost more time and money in the long run.
Real-World Applications and Case Studies
Grease fittings are vital across multiple industries and machinery types. Here’s how and where they’re used:
- Heavy equipment: Excavators, loaders, and bulldozers rely on dozens of grease points to keep joints, pins, and bearings operational.
- Automotive: Trucks and trailers use grease fittings on suspension parts like tie rods and U-joints for optimal performance.
- Agricultural machinery: Tractors, harvesters, and implements include numerous grease points due to constant exposure to dirt and vibration.
- Manufacturing: Industrial presses and conveyors use precision grease fittings for maintenance without disassembly.
Regardless of the application, properly maintained grease fittings ensure efficient performance and reduced downtime.
Conclusion
Replacing a grease fitting is a quick, affordable, and essential maintenance task that protects your machinery from costly damage. By understanding the signs of failure, using the right tools, and following proper installation steps, you can keep your equipment running smoothly and safely. Regular inspection and greasing are key to a long-lasting lubrication system.
Whether you’re maintaining farm equipment, automotive parts, or industrial machines, don’t overlook this small but powerful component.
FAQs
What is the lifespan of a grease fitting?
With proper maintenance, a grease fitting can last several years. However, environmental exposure, physical damage, or contamination may shorten its lifespan.
Can you use tape instead of thread sealant?
Yes, Teflon tape is an acceptable alternative to thread sealant, but it must be applied sparingly to avoid contaminating the grease path.
Are all grease fittings universal?
No. Grease fittings vary by thread type (SAE, metric, NPT), angle, and size. Always match the replacement to your equipment’s specifications.
How often should I grease my equipment?
Frequency depends on usage and environment, but a general rule is to grease moving parts every 10–50 operating hours or as recommended by the manufacturer.
What’s the best way to clean a clogged grease fitting?
Use a grease fitting cleaning tool or solvent injection kit. In some cases, replacing the fitting is faster and more reliable.


